Custom Awards & Corporate Plaques – Sustainable Wooden Recognition, Made in Ireland
Custom Wood Designs creates bespoke awards, plaques and medals that feel as meaningful as the achievement. Hand-finished in Dublin using FSC-certified timbers (oak, birch ply, beech) with precision laser engraving From one-off centrepieces to 500+ unit rollouts, we blend craft, brand consistency, and sustainability.
Bespoke wooden awards and plaques, made in Ireland. FSC timber, laser engraving, Pantone/RAL matching. One-off to 500+ units. Fast 3–4 week lead times.

Plant Paradise: Creating a Stunning Indoor Garden with Wooden Crates
Indoor gardening has become increasingly popular as people seek to bring nature into their homes and create a serene and vibrant atmosphere. If you're looking to embark on a rewarding DIY project that combines your love for plants and creativity, why not create a stunning indoor garden using wooden crates? In this blog post, we will guide you through the process of transforming wooden crates into a plant paradise, allowing you to enjoy the beauty of nature right in your own living space.
Materials Needed:
- Wooden crates: Choose crates of different sizes and shapes to add visual interest to your indoor garden.
- Sandpaper: Smooth any rough edges or surfaces of the wooden crates.
- Paint or stain: Select colors that complement your home decor or opt for a natural wood finish.
- Plastic lining or landscape fabric: Line the inside of the crates to prevent soil from spilling out.
- Potting soil: Choose a high-quality potting mix suitable for the types of plants you plan to grow.
- Plants: Select a variety of indoor plants that thrive in your home's lighting conditions.
- Gardening tools: Gather essential tools such as a trowel, watering can, and pruning shears.
Step-by-Step Instructions:
-
Prepare the Wooden Crates: Inspect the wooden crates for any rough spots or splinters. Use sandpaper to smooth the surfaces, paying extra attention to the edges and corners. Wipe away any dust or debris to ensure a clean surface for painting or staining.
-
Customize the Crates: Unleash your creativity by painting or staining the wooden crates to match your home decor or create a unique look. Consider using non-toxic paint or food-safe stain if you plan to grow edible plants. Allow the crates to dry completely before proceeding to the next step.
-
Line the Crates: To prevent soil from escaping through the gaps in the crates, line the inside with plastic or landscape fabric. Trim the lining to fit the dimensions of the crate and secure it in place using staples or adhesive.
-
Fill the Crates with Potting Soil: Add a layer of high-quality potting soil to each crate, ensuring it is evenly distributed. Leave enough space for the root systems of the plants you will be adding.
-
Choose and Arrange Your Plants: Select a variety of indoor plants that thrive in the lighting conditions of your home. Consider factors such as sunlight exposure and humidity requirements when choosing your plants. Arrange the plants in the crates, keeping in mind their growth habits and the visual composition you desire.
-
Water and Maintain Your Indoor Garden: Water your plants according to their specific needs and monitor their growth regularly. Ensure that the soil remains moist but not waterlogged. Prune and trim your plants as necessary to maintain their shape and promote healthy growth.
-
Enjoy Your Indoor Garden: Step back and admire your creation! Your stunning indoor garden created with wooden crates is now ready to bring a touch of nature and tranquility to your living space. Enjoy the lush greenery, the refreshing air, and the therapeutic benefits that indoor gardening provides.
- Boxes shop here
- Crates shop here
Maybe ? Custom Made Promo Products
Custom Made Promo Products
Looking for promotional products that actually get kept and used? Tell us yourquantity, budget, branding idea, and delivery dateand we’ll recommend the bestcustom made promo productsfor campaigns, events, staff packs, and hospitality — witheco-friendly options, premium packaging, and branding support (logo-ready artwork)
From Your Printed Cardboard Gift Sets Department
Tell us yourquantity, occasion, budget, and delivery date— we’ll shortlist the bestbranded corporate gift setoptions for your team, clients, events, or hospitality. Choose fromeco packagingand upgrade towooden gift boxesfor a more premium finish.EU / USA / UAE enquiries welcome.]Ireland + UK


Nardi Outdoor Furniture Offer
Upgrade your outdoor space with Fermob.
We supply iconic French outdoor furniture built for high-traffic venues — weather-resistant finishes, standout colour options, and a premium look that elevates any space. Tell us your venue type, quantity, and deadline and we’ll recommend the best set-up.
Contact to order:info@customwooddesigns.ie
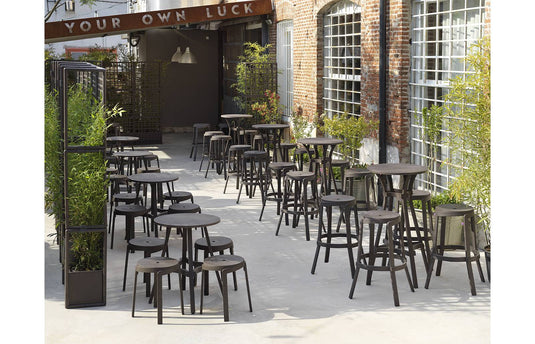


Fermob Ireland & UK , Commercial Outdoor Furniture Supply
Upgrade your outdoor space with Fermob.
We supply iconic French outdoor furniture built for high-traffic venues — weather-resistant finishes, standout colour options, and a premium look that elevates any space. Tell us your venue type, quantity, and deadline and we’ll recommend the best set-up.
Contact to order:info@customwooddesigns.ie
Globo Hanging Chair / Globo Furniture
Turn a corner into a destination.
Statement design • Timber frame • Indoor / outdoor
Globo hanging chairs are perfect for venues that want guests to linger — comfortable, design-led, and instantly memorable. Tell us your space type, quantity, and deadline and we’ll recommend the best Globo option and accessories.
Contact:info@customwooddesigns.ie


Contact Us
Please fill out the form below and we’ll get back to you within 24 hours.