Custom Awards & Corporate Plaques – Sustainable Wooden Recognition, Made in Ireland
Custom Wood Designs creates bespoke awards, plaques and medals that feel as meaningful as the achievement. Hand-finished in Dublin using FSC-certified timbers (oak, birch ply, beech) with precision laser engraving From one-off centrepieces to 500+ unit rollouts, we blend craft, brand consistency, and sustainability.
Bespoke wooden awards and plaques, made in Ireland. FSC timber, laser engraving, Pantone/RAL matching. One-off to 500+ units. Fast 3–4 week lead times.

Discover the Art of Decoupage: Transforming Wooden Boxes with Creative Techniques
Decoupage is an artistic technique that involves decorating surfaces, such as wooden boxes, with carefully cut and layered paper, followed by sealing and finishing. This versatile craft allows you to unleash your creativity and transform plain wooden boxes into personalized works of art. In this blog post, we will explore the art of decoupage, providing step-by-step instructions, examples of techniques, and inspiring ideas to create stunning decoupaged wooden boxes.
- Gather Your Materials: To get started with decoupage, you will need a few basic supplies:
- Wooden box: Choose a plain wooden box that suits your desired size and shape.
- Decorative paper: Select patterned paper, tissue paper, or even napkins with designs that inspire you.
- Mod Podge: This versatile decoupage medium acts as both an adhesive and a sealer.
- Paintbrushes: Use different brush sizes to apply Mod Podge and smooth out wrinkles.
- Scissors: Precisely cut your chosen paper designs.
-
Prepare Your Wooden Box: Ensure that your wooden box is clean, dry, and free from any rough surfaces or splinters. Sand it lightly if needed and wipe away any dust or debris.
-
Choose Your Decoupage Design: The beauty of decoupage lies in its endless possibilities. You can opt for a cohesive theme, such as floral, vintage, or geometric patterns, or mix and match different designs for a more eclectic look. Consider the recipient's preferences or your desired aesthetic.
-
Cut and Arrange Your Paper: Carefully cut out your chosen paper designs or tear them into desired shapes. Arrange the pieces on your wooden box, experimenting with placement and composition until you achieve the desired look.
-
Apply Mod Podge: Using a paintbrush, apply a thin and even layer of Mod Podge to the back of your first paper piece. Press it onto the wooden box, smoothing out any wrinkles or air bubbles gently. Repeat this step for all the paper pieces, layering them as desired.
-
Seal and Protect: Once your decoupage design is complete and dry, apply a coat of Mod Podge over the entire surface of the wooden box. This will seal and protect your design, providing a durable and glossy finish. Allow it to dry completely before handling.
-
Enhance with Additional Techniques: To add depth and interest to your decoupage design, consider incorporating additional techniques, such as:
- Stenciling: Use stencils and acrylic paint to create intricate patterns or designs on top of your decoupaged surface.
- Embellishments: Adorn your wooden box with charms, ribbons, beads, or other decorative elements to enhance its visual appeal.
- Aging or distressing: Apply a light layer of stain or paint to give your wooden box an aged or distressed look, adding character and vintage charm.
Examples of Decoupage Ideas:
- Vintage Charm: Decoupage your wooden box with delicate floral designs and distressed edges for a romantic and vintage-inspired look.
- Travel Memories: Use maps or postcards from your favorite destinations to create a decoupage collage on your wooden box, capturing your travel memories in a unique way.
- Nature-Inspired: Choose botanical prints or leaf patterns to bring the beauty of nature to your wooden box, creating a serene and organic feel.
Buy boxes here
Maybe ? Custom Made Promo Products
Custom Made Promo Products
Looking for promotional products that actually get kept and used? Tell us yourquantity, budget, branding idea, and delivery dateand we’ll recommend the bestcustom made promo productsfor campaigns, events, staff packs, and hospitality — witheco-friendly options, premium packaging, and branding support (logo-ready artwork)
From Your Printed Cardboard Gift Sets Department
Tell us yourquantity, occasion, budget, and delivery date— we’ll shortlist the bestbranded corporate gift setoptions for your team, clients, events, or hospitality. Choose fromeco packagingand upgrade towooden gift boxesfor a more premium finish.EU / USA / UAE enquiries welcome.]Ireland + UK


Nardi Outdoor Furniture Offer
Upgrade your outdoor space with Fermob.
We supply iconic French outdoor furniture built for high-traffic venues — weather-resistant finishes, standout colour options, and a premium look that elevates any space. Tell us your venue type, quantity, and deadline and we’ll recommend the best set-up.
Contact to order:info@customwooddesigns.ie
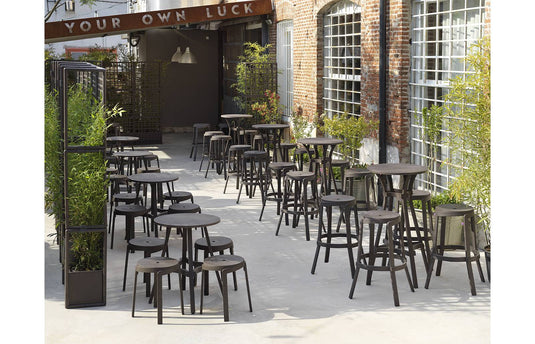


Fermob Ireland & UK , Commercial Outdoor Furniture Supply
Upgrade your outdoor space with Fermob.
We supply iconic French outdoor furniture built for high-traffic venues — weather-resistant finishes, standout colour options, and a premium look that elevates any space. Tell us your venue type, quantity, and deadline and we’ll recommend the best set-up.
Contact to order:info@customwooddesigns.ie
Globo Hanging Chair / Globo Furniture
Turn a corner into a destination.
Statement design • Timber frame • Indoor / outdoor
Globo hanging chairs are perfect for venues that want guests to linger — comfortable, design-led, and instantly memorable. Tell us your space type, quantity, and deadline and we’ll recommend the best Globo option and accessories.
Contact:info@customwooddesigns.ie


Contact Us
Please fill out the form below and we’ll get back to you within 24 hours.