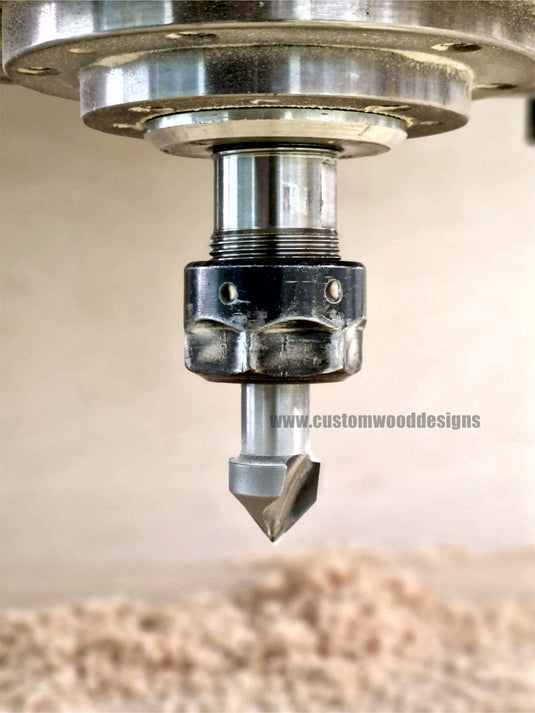
Custom Awards & Corporate Plaques – Sustainable Wooden Recognition, Made in Ireland
Custom Wood Designs creates bespoke awards, plaques and medals that feel as meaningful as the achievement. Hand-finished in Dublin using FSC-certified timbers (oak, birch ply, beech) with precision laser engraving From one-off centrepieces to 500+ unit rollouts, we blend craft, brand consistency, and sustainability.
Bespoke wooden awards and plaques, made in Ireland. FSC timber, laser engraving, Pantone/RAL matching. One-off to 500+ units. Fast 3–4 week lead times.

Organize with Style: DIY Drawer Dividers Using Wooden Boxes
Are you tired of rummaging through cluttered drawers in search of that elusive item? It's time to bring order and style to your drawers with DIY drawer dividers using wooden boxes. By repurposing wooden boxes, you can create customized dividers that not only maximize storage space but also add a touch of elegance to your organization system. In this blog post, we will guide you through the process of creating unique and functional drawer dividers using wooden boxes, helping you organize with style.
Materials Needed:
- Wooden boxes: Choose boxes that fit the dimensions of your drawers and suit your style preferences.
- Measuring tape or ruler: Use precise measurements to ensure a perfect fit inside your drawers.
- Saw or box cutter: Cut the wooden boxes to the desired height and width for your dividers.
- Sandpaper: Smooth any rough edges or surfaces of the wooden dividers.
- Paint or stain: Select colors or finishes that complement your drawer interiors or match your decor.
- Adhesive or nails: Secure the dividers in place within the drawer.
Step-by-Step Instructions:
-
Measure and Plan: Start by measuring the dimensions of your drawer. Determine how many compartments or sections you want to create and how the dividers will be arranged. Plan the layout based on the items you intend to store.
-
Prepare the Wooden Boxes: If the wooden boxes are too tall for your drawers, use a saw or box cutter to trim them to the desired height. Smooth any rough edges or surfaces using sandpaper. Ensure that all the dividers have the same height for a uniform look.
-
Paint or Stain the Dividers: Choose a paint color or wood stain that complements the interior of your drawers or matches your overall decor theme. Apply a coat of paint or stain to each wooden divider, allowing it to dry completely before proceeding.
-
Arrange the Dividers: Position the dividers inside the drawer according to your planned layout. Ensure they fit snugly and create compartments of the desired size. Make any necessary adjustments before securing them in place.
-
Secure the Dividers: Use adhesive or nails to fix the dividers to the drawer. If using adhesive, apply it to the bottom of each divider and press firmly into place. For nails, carefully hammer them into the sides of the drawer, ensuring stability and a secure fit.
-
Customize and Decorate: Get creative with personalizing your dividers. Consider adding labels or decorative elements to each compartment to further enhance the organization and visual appeal. You can use adhesive labels, chalkboard paint, or decorative washi tape to add a touch of style.
-
Organize with Style: Once the dividers are securely in place, it's time to start organizing! Sort and store your items in their designated compartments. Whether it's socks, accessories, office supplies, or kitchen utensils, you'll be amazed at how the dividers keep everything neatly arranged and easily accessible.
buy boxes here
buy crates here
Maybe ? Custom Made Promo Products
Custom Made Promo Products
Looking for promotional products that actually get kept and used? Tell us yourquantity, budget, branding idea, and delivery dateand we’ll recommend the bestcustom made promo productsfor campaigns, events, staff packs, and hospitality — witheco-friendly options, premium packaging, and branding support (logo-ready artwork)
From Your Printed Cardboard Gift Sets Department
Tell us yourquantity, occasion, budget, and delivery date— we’ll shortlist the bestbranded corporate gift setoptions for your team, clients, events, or hospitality. Choose fromeco packagingand upgrade towooden gift boxesfor a more premium finish.EU / USA / UAE enquiries welcome.]Ireland + UK


Nardi Outdoor Furniture Offer
Upgrade your outdoor space with Fermob.
We supply iconic French outdoor furniture built for high-traffic venues — weather-resistant finishes, standout colour options, and a premium look that elevates any space. Tell us your venue type, quantity, and deadline and we’ll recommend the best set-up.
Contact to order:info@customwooddesigns.ie
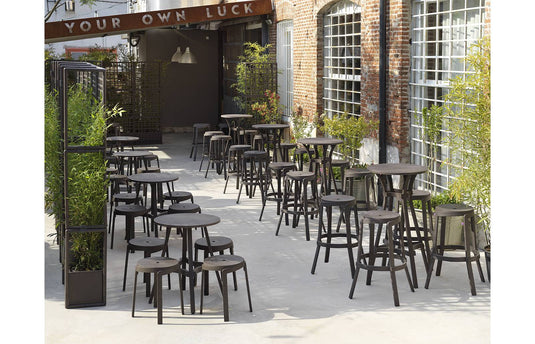


Fermob Ireland & UK , Commercial Outdoor Furniture Supply
Upgrade your outdoor space with Fermob.
We supply iconic French outdoor furniture built for high-traffic venues — weather-resistant finishes, standout colour options, and a premium look that elevates any space. Tell us your venue type, quantity, and deadline and we’ll recommend the best set-up.
Contact to order:info@customwooddesigns.ie
Globo Hanging Chair / Globo Furniture
Turn a corner into a destination.
Statement design • Timber frame • Indoor / outdoor
Globo hanging chairs are perfect for venues that want guests to linger — comfortable, design-led, and instantly memorable. Tell us your space type, quantity, and deadline and we’ll recommend the best Globo option and accessories.
Contact:info@customwooddesigns.ie


Contact Us
Please fill out the form below and we’ll get back to you within 24 hours.